In this DIY guide, we will walk you through the process of how to make your own strip lashes. With simple tools and some creativity, you’ll be able to achieve the perfect fluttery lashes customized to your unique style. So let’s get started!
Step-By-Step DIY Guide On How To Make Your Own Strip Lashes At Home
Making your own strip lashes at home can be a creative and fun project. Keep in mind that this process requires precision and careful handling of materials. Here’s a step-by-step guide to help you how to make your own strip lashes:
Gather Your Materials On How To Make Your Own Strip Lashes At Home
While store-bought strip lashes have become readily available, the allure of crafting your own strip lashes at home presents a creative and fulfilling opportunity. This DIY project combines precision, artistry, and personal flair to produce a custom set of lashes that perfectly complement your unique style.
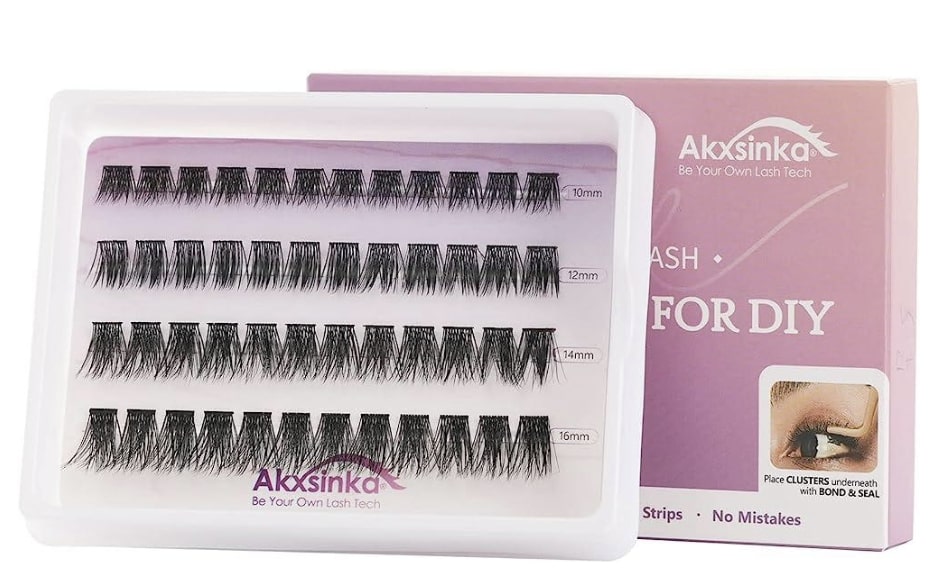
- Lash Fibers: The foundation of your strip lashes, lash fibers come in various styles and materials. Choose between synthetic lash fibers for budget-friendly options or human hair lashes for a more natural look. The choice of lash fibers will define the overall appearance of your lashes and how to make your own strip lashes.
- Eyelash Glue: A crucial element in the lash-making process, eyelash glue ensures that your lash fibers adhere securely to the strip. Opt for a high-quality, waterproof adhesive that dries clear for a flawless finish.
- Tweezers: Precision is key when working with delicate lash fibers. Tweezers help you carefully place each individual lash fiber onto the adhesive strip, allowing for meticulous customization.
- Small Scissors: These are essential for trimming your lash strip to the desired length and shape. Precision is vital here as well, as the right length and shape will contribute to the natural appearance of your finished strip lashes.
- Lash Strip Mold or Lash Tray: To create a curved shape that mimics the natural curve of your eyelids, a lash strip mold or tray is invaluable. It assists in setting the curvature of the lashes for a comfortable and realistic fit. Besides, when intending to buy short fake eyelashes, consider factors like lash material (synthetic, mink, silk), lash band (clear or black), lash style (natural, wispy, individual clusters), and the adhesive that comes with the lashes. It’s a good idea to read customer reviews and check for any allergic reactions to lash adhesive before making a decision to buy short fake eyelashes.
- Lash Adhesive Tape or Lash Adhesive Stickers (Optional): If you’re looking for convenience, lash adhesive tape or stickers can be used instead of traditional lash glue. They provide a mess-free alternative for attaching your lash fibers.
The art of how to make your own strip lashes at home is an engaging DIY project that requires careful consideration of the materials involved. The choice of lash fibers, adhesive, and tools contributes to the final result, which is a reflection of your unique style and creativity. This venture demonstrates that the beauty industry not only provides products but also avenues for personal expression and ingenuity. So, gather your materials, embrace the artistic journey, and let your lashes speak volumes about your individuality and creativity.
Measure And Trim The Lash Strips On How To Make Your Own Strip Lashes At Home
How to make your own strip lashes at home is a fascinating blend of creativity and precision. One of the crucial steps in this process is measuring and trimming the lash strips to achieve a seamless and comfortable fit. Whether you’re aiming for a natural look or a dramatic flair, proper measurement and trimming ensure that your DIY lashes enhance your eyes in the most flattering way.
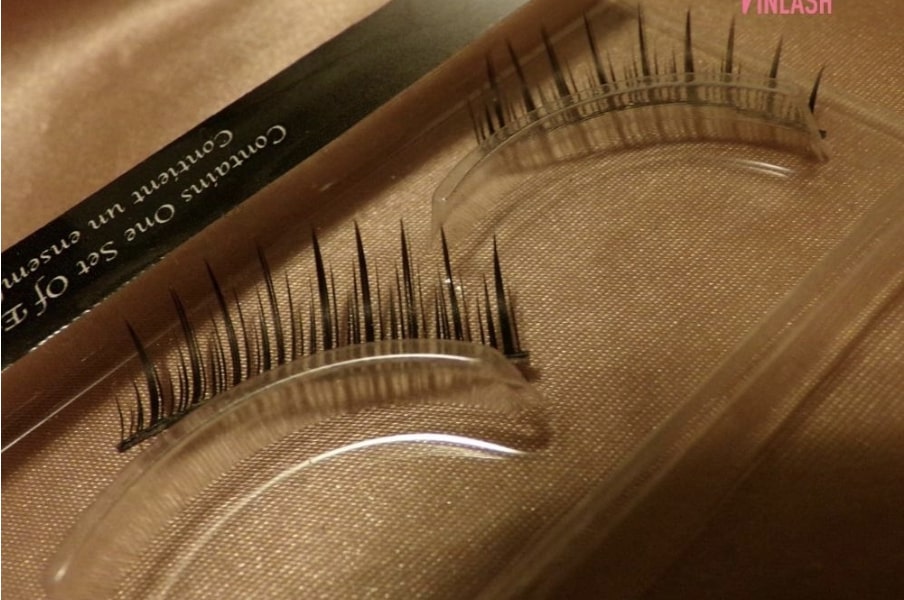
- Step 1: Choose Your Lash Strips: Select the lash strips that you’ve created or purchased. These strips usually come with lash fibers attached and are ready to be customized to fit your eye shape and consider how to make your own strip lashes.
- Step 2: Prepare Your Workspace: Ensure you have a clean, well-lit workspace where you can comfortably work with your lash strips and tools.
- Step 3: Measure the Lash Strip: Hold the lash strip against your natural lash line, starting from the inner corner and aligning it with your actual lashes. Gently press the strip to check its fit. Note where the strip extends beyond your outer corner.
- Step 4: Trim the Lash Strip: Using small scissors, trim the outer corner of the lash strip to match the length of your natural lash line. It’s better to start by trimming a little at a time to avoid cutting too much. Remember that you can always trim more if needed.
- Step 5: Check the Fit: Place the trimmed lash strip against your natural lash line again to ensure that it now fits snugly from inner to outer corner. The strip should comfortably follow the curvature of your eyelid.
- Step 6: Repeat for the Other Eye: Repeat the measuring and trimming process for the lash strip you’ll use on your other eye. It’s essential to achieve symmetry in length for a balanced appearance.
- Step 7: Adjust as Necessary: If you find that the lash strip is still slightly too long or if it’s not adhering comfortably along your lash line, you can make further adjustments by trimming small sections from the outer corner until the desired fit is achieved.
- Step 8: Repeat for Future Applications: Once you’ve mastered the art of measuring and trimming your lash strips, you can apply the same technique to any future lash strips you create or purchase on how to make your own strip lashes. Remember that each set of lashes might require slightly different measurements due to variations in eye shapes and preferences.
In conclusion, measuring and trimming lash strips is a fundamental skill in the DIY on how to make your own strip lashes process. This step ensures that your strip lashes fit comfortably and enhance your eyes‘ natural beauty. With patience and practice, you’ll master this technique and enjoy the satisfaction of creating custom lash strips that perfectly complement your individual style.
Use A Lash Adhesive On How To Make Your Own Strip Lashes At Home
How to make your own strip lashes at home allows you to infuse your personality into your beauty routine. One of the essential elements in this process is using lash adhesive to ensure that your handmade lashes stay securely in place, providing a seamless and stunning look. Proper application of lash adhesive is key to achieving the desired effect and comfort.
- Step 1: Select Your Lash Adhesive: Choose a high-quality lash adhesive that suits your needs. Clear adhesive works well for a more natural look, while black adhesive adds extra definition to the lash line, simulating eyeliner.
- Step 2: Prepare Your Workspace: Ensure you’re working in a well-lit area with all your materials within reach.
- Step 3: Apply Lash Adhesive: Squeeze a small amount of lash adhesive onto the back of your hand or another clean surface. Using tweezers, carefully dip the base of the lash strip into the adhesive. Ensure an even and thin coating along the lash strip. Avoid using too much adhesive, as it may lead to clumping or an uncomfortable fit.
- Step 4: Wait for the Adhesive to Become Tacky: After applying the adhesive to the lash strip, wait for about 20 to 30 seconds. This allows the adhesive to become slightly tacky, which enhances its bonding properties.

In conclusion, using lash adhesive is a crucial step in how to make your own strip lashes at home. Proper application of the adhesive ensures that your DIY lashes stay securely in place, enhancing your eyes‘ beauty with a natural or dramatic touch, depending on your preference. With care and attention to detail, you’ll master the art of applying lash adhesive and enjoy the satisfaction of flaunting your custom-made strip lashes.
Apply The Lash Strip On How To Make Your Own Strip Lashes At Home
After crafting your own strip lashes and preparing them with lash adhesive, the next exciting step is applying the lash strip on how to make your own strip lashes. This step requires precision, patience, and a steady hand to achieve a flawless and comfortable fit. In this guide, we’ll walk you through the process of applying the lash strip to ensure that your DIY strip lashes enhance your eyes‘ natural beauty with elegance and confidence.
- Step 1: Prepare Your Workspace: Set up your workspace with a well-lit mirror and all your materials within easy reach.
- Step 2: Check Lash Strip Placement: Hold the lash strip with tweezers and align it with your natural lash line to ensure proper placement. The inner corner of the strip should start where your natural lashes begin, and the outer corner should extend to the outer edge of your eye.
- Step 3: Angle the Lash Strip: Tilt the lash strip slightly so that the inner corner is closer to your nose and the outer corner aligns with the outer edge of your eye. This angle mimics the natural curve of your eyelid.
- Step 4: Begin Application: Starting from the inner corner of your eye, use the tweezers to gently press the lash strip onto your natural lash line. Place the strip as close to your natural lashes as possible for a seamless blend.
- Step 5: Secure the Middle and Outer Corners: After adhering the inner corner, press down along the middle of the lash strip, ensuring it follows the curvature of your eyelid. Finally, secure the outer corner by gently pressing it down.
- Step 6: Adjust the Placement: Using the tweezers, carefully adjust the placement of the lash strip if needed. Ensure that it sits comfortably and aligns with your natural lashes.
- Step 7: Hold and Let Dry: Hold the lash strip in place for a few seconds to allow the adhesive to bond. This initial hold ensures that the strip stays in place as the adhesive sets.
- Step 8: Repeat for the Other Eye: Repeat the same process for the lash strip on your other eye. Aim for symmetry in both placement and angle.
- Step 9: Blink and Assess: Gently blink your eyes a few times to ensure that the lash strip feels comfortable and secure. Assess the placement in the mirror to make sure both strips are aligned.
- Step 10: Blend with Natural Lashes: Use a lash comb or spoolie brush to gently comb through both your natural lashes and the strip lashes. This step creates a harmonious blend and ensures a polished look.
In conclusion, applying the lash strip on how to make your own strip lashes is the culmination of your DIY strip lashes journey. With careful placement, a steady hand, and the right tools, you can achieve a stunning look that enhances your eyes‘ beauty and expresses your individual style. As you master this step, you’ll confidently flaunt your custom-made strip lashes with elegance and grace.
Position And Secure the Lashes On How To Make Your Own Strip Lashes At Home
In the world of beauty and self-expression, the art of enhancing our eyes with strip lashes has remained an iconic choice. While commercial options abound, the allure of how to make your own strip lashes at home presents an opportunity for artistic exploration. Among the many critical steps involved, positioning and securing the lashes stand out as essential components in achieving a polished and comfortable result.
- Step 1: Prepare Your Workspace: Ensure your workspace is well-lit and comfortable, allowing you to focus on the precise placement of the lashes.
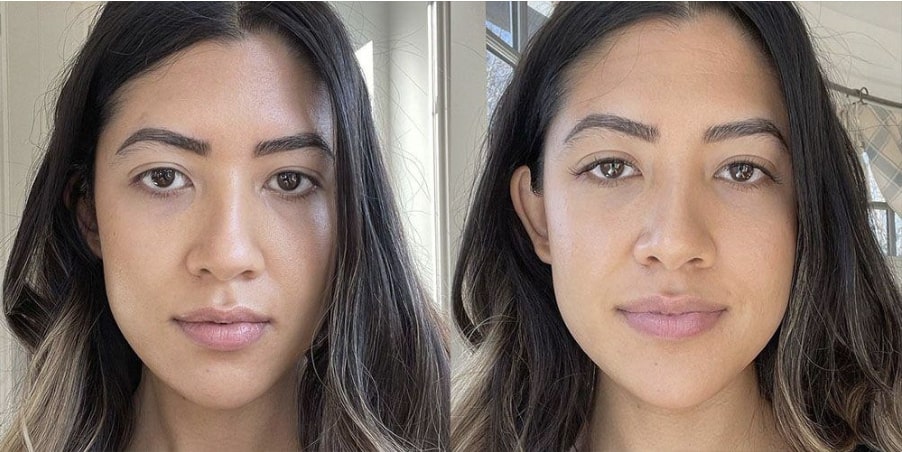
- Step 2: Assess the Position: Look in the mirror and assess the position of the lash strips. Check if they align well with your natural lash line and if the curvature matches the shape of your eyelids. Moreover, know how to apply strip lashes underneath your natural lashes is a creative way to enhance your eyes and add a touch of uniqueness to your makeup look. With patience and practice, you can master this know how to apply strip lashes underneath technique and achieve a charming and doll-like appearance that complements your overall makeup style.
- Step 3: Adjust if Necessary: Using the tweezers, gently lift the lash strip if you notice any misalignment or if the curvature doesn’t match your eyelid’s shape. Make small adjustments to achieve the desired placement.
- Step 4: Secure the Inner Corner: Starting from the inner corner, press down on the lash strip with the tweezers to ensure that it adheres securely along your natural lash line. This step provides a stable foundation for the rest of the lash strip.
- Step 5: Secure the Middle and Outer Corners: Continue pressing down along the middle of the lash strip and then move on to the outer corner. Take your time to press down gently and evenly, ensuring the entire strip is securely adhered.
- Step 6: Blend with Natural Lashes: Use a lash comb or spoolie brush to gently comb through both your natural lashes and the strip lashes. This action blends the two sets of lashes together, creating a seamless and cohesive appearance.
- Step 7: Check for Comfort: Blink and move your eyes naturally to ensure that the lash strips feel comfortable and secure. If you experience any discomfort or the lashes are poking your eyelids, adjust the placement as needed.
- Step 8: Assess Symmetry: Look closely in the mirror to ensure that both lash strips are symmetrically positioned. Adjust if necessary to achieve a balanced and harmonious look.
In conclusion, positioning and securing the lashes is the final step in your DIY strip lashes journey. With careful placement, blending, and a keen eye for symmetry, you can achieve a stunning look that enhances your eyes‘ natural beauty. As you master this step, you’ll confidently showcase your unique style, radiating confidence and elegance wherever you go.
Removing Your DIY Strip Lashes On How To Make Your Own Strip Lashes At Home
How to make your own strip lashes at home is an exciting journey that enhances your beauty and style. Just as important as applying your handmade lashes is knowing how to remove them safely and gently. Proper removal ensures that your natural lashes remain healthy and your next DIY lash adventure starts on the right foot.
- Step 1: Prepare Your Workspace: Set up your workspace with a mirror, cotton pads, lash adhesive remover, and any optional materials you’ll be using.
- Step 2: Assess the Lash Adhesive: Before starting the removal process, gently assess the lash adhesive. If the adhesive has naturally loosened or if it’s time for removal, you’ll notice the strip edges lifting slightly.
- Step 3: Apply Lash Adhesive Remover: Dip a cotton pad or makeup remover pad into the lash adhesive remover solution. Gently press the soaked pad onto your closed eyelid, making sure it touches the base of the lash strip. Hold it in place for a few seconds to allow the remover to penetrate the adhesive.
- Step 4: Gently Remove the Lash Strip: After letting the adhesive remover work its magic, gently grasp the outer corner of the lash strip using your fingers or tweezers if needed. Slowly and gently peel the strip away from your eyelid, moving from the outer corner toward the inner corner. If you encounter resistance, stop and apply more adhesive remover.
- Step 5: Cleanse the Area: Use a water-based makeup remover on a cotton pad to clean your eyelid and remove any residual lash adhesive. Gently wipe the area to ensure that it’s clean and adhesive-free.
- Step 6: Care for Your Natural Lashes: After removing the strip lashes, it’s a good idea to give your natural lashes a break. Avoid applying mascara immediately after removal to allow your lashes to breathe and recover.
- Step 7: Store Your DIY Lashes: If you plan to reuse your DIY strip lashes, gently remove any residual adhesive from the lash strip using your fingers or tweezers. Store the lashes in their original packaging or a clean container to maintain their shape.
In conclusion, removing your DIY strip lashes is a crucial step in maintaining the health of your natural lashes and eyelids. By following these steps and handling the process gently, you’ll ensure that your eyes stay beautiful and healthy while preparing for your next adventure in crafting and wearing your handmade lashes.
Tips And Tricks For Perfect Lashes Every Time On How To Make Your Own Strip Lashes At Home
How to make your own strip lashes at home is a journey filled with creativity and self-expression. To help you achieve stunning results, here are some tips and tricks that will elevate your DIY lash game and ensure your handmade lashes look flawless every time you wear them.
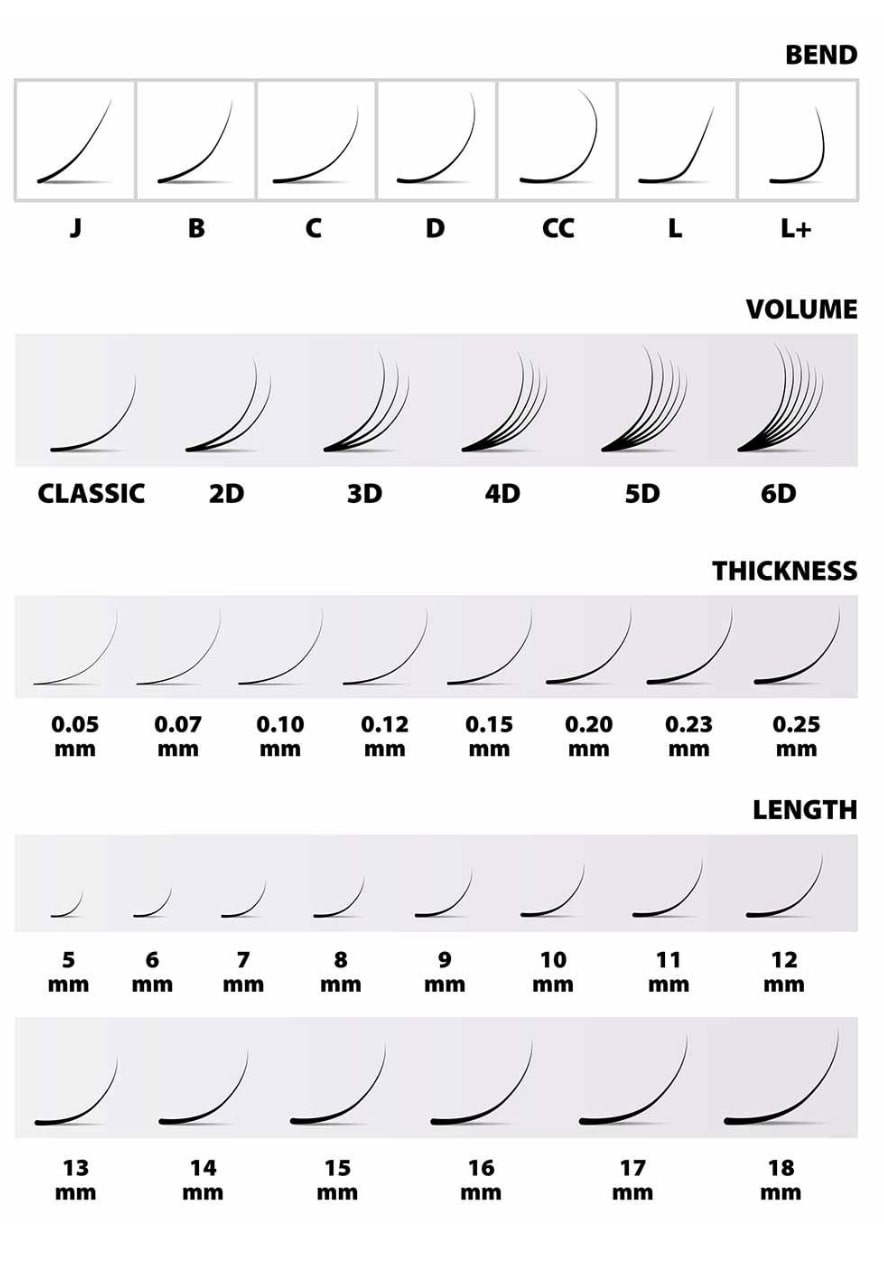
- Experiment with Different Lash Styles: Don’t be afraid to explore various lash styles to find what suits you best. Whether you prefer natural, wispy lashes or bold and dramatic ones, experimenting with different lash fiber lengths, densities, and arrangements allows you to create a variety of looks to match any occasion.
- Create a Seamless Look: For a seamless blend between your natural lashes and your DIY strip lashes, ensure the lash fibers are well-spaced and evenly placed along the lash strip. This meticulous attention to detail will give the appearance of fuller, naturally voluminous lashes.
- Layer for a Dramatic Effect: If you’re seeking an extra touch of drama, consider layering two different sets of DIY strip lashes. Applying a thinner, more natural set as a base and then adding a thicker, more voluminous set on top can create a stunning and multidimensional effect.
- Practice Makes Perfect: Perfecting the art of creating and applying your own strip lashes requires practice. Don’t get discouraged if your first attempts aren’t flawless. With time, your skills will improve, and you’ll develop an intuitive sense of how to achieve the results you desire.
In conclusion, achieving perfect lashes every time with your DIY strip lashes is a blend of creativity, precision, and practice. By experimenting with different styles, perfecting your application technique, and investing in quality materials, you’ll unlock the full potential of creating your own custom lash looks. Embrace these tips and tricks as you embark on a journey of self-expression and beauty enhancement, crafting lashes that truly embody your unique style.
The Benefits On How To Make Your Own Strip Lashes At Home
How to make your own strip lashes at home comes with several benefits that can enhance your beauty routine and give you a personalized touch. Here are some of the key advantages of making your own strip lashes:
- Customization: You have full control over the style, length, and volume of your lashes, allowing you to tailor them to your unique preferences.
- Sustainability: By reusing your DIY strip lashes, you reduce waste and contribute to a more sustainable beauty routine. Remember that everyone’s experience with extended wear can vary based on factors such as your skin type, activities, and the quality of the adhesive used. While some people can successfully discover how to make strip lashes last a week, others might find it challenging to maintain the perfect look for that long. To discover how to make strip lashes last a week requires careful application, proper maintenance, and a few tricks to ensure they stay in place and look great throughout the week. Always prioritize your comfort and the health of your natural lashes, and remove the strip lashes if you experience any irritation or discomfort.
- Creativity: Making your own lashes opens up a world of creativity, allowing you to experiment with different looks and express your personal style. Did you know that you can add unique embellishments to your DIY strip lashes, such as rhinestones or feathers, to create a truly one-of-a-kind look?
- Cost Savings: Let’s not forget the most obvious benefit – saving money! DIY strip lashes are a fraction of the cost compared to store-bought ones, making them an affordable option for everyone. With the money you save from making your own strip lashes, you can invest in other beauty products or treat yourself to a spa day.
In conclusion, how to make your own strip lashes at home offers a range of benefits that cater to customization, creativity, cost-effectiveness, and personal empowerment. By taking control of your lash style and crafting beautiful lashes that enhance your eyes, you’ll enjoy a unique and fulfilling beauty experience.
Conclusion
How to make your own strip lashes is a fun and rewarding process that allows you to customize your look while saving money. With this DIY guide, you now have all the tools and knowledge to embark on your lash-making journey. So go ahead, unleash your creativity, and flutter those beautiful handmade lashes!
Napsat komentář